User Interface Overview
The ToolMap user interface integrates the following elements:
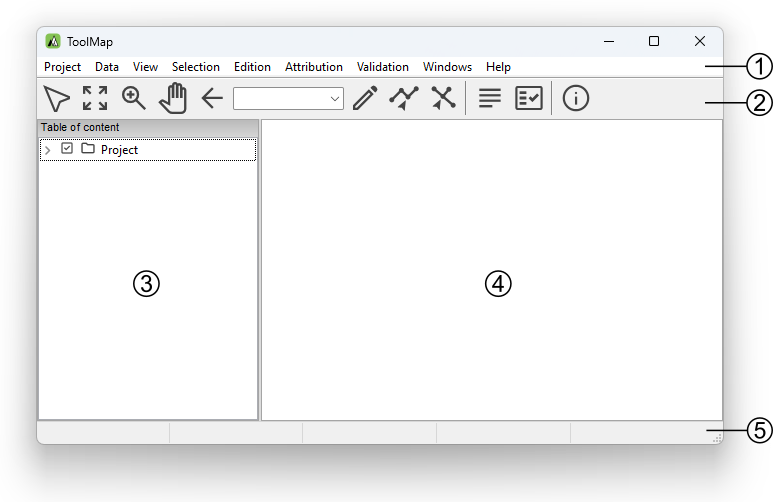
Menu bar
Toolbar
Table of content
Visualization and editing window
Status bar
Toolbar
The toolbar is accessible on top of the application window, right under the menu bar. It allows to quickly access to the different main tools available in ToolMap. Most of the toolbar buttons are grayed out while no project is open.
Selection tool
Select one or several geometrical objects
Navigation tools
Zoom to the maximum extent of all visible layers
Zoom in or out into the visualization window
Pan the view in any direction
Go back to the previous zoom extent
Edition tool
Draw a new object
Modify an existing object
Modify shared node
Attribution tools
Display the Object kind panel
Display the Object attribute window
Information tool
Display the identification window
Scale
Drop-down menu of available scales. User defined scale can be set using the menu
Table of Content
Important
The table of contents has been completely redesigned in the version 4.0
The table of content shows a list of all the layers loaded in the project. It looks like the following:
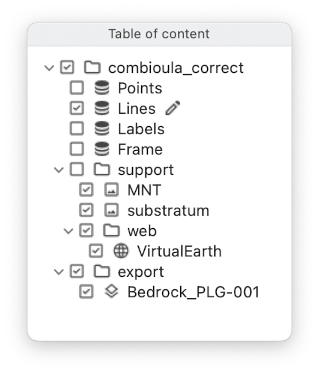
The following items may appear in the table of contents:
 Construction layers
 Raster support themes
 Web support layers
 Shapefiles
 Groups that can contain other groups or the above layers
Construction layers are automatically generated at the creation of the project and can be edited. When this is the case, the following icon is displayed next to their names  . Support Themes cannot be edited.
Visibility
 Layer / group displayed
 Layer / group hidden
See also
More information on how the table of contents works is available in the Table of contents options topic.
Status bar
The status bar at the bottom of the application window provides additional information like geographical coordinates or the number of features selected.
Keyboard shortcuts
Keyboard Shortcuts have been set to the most used functions to make the use of Toolmap easier and quicker.
Note
Under Mac OSX, Ctrl is replaced by the standard CMD(⌘) button.
Project management
Ctrl+N: Create a new empty project
Ctrl+Alt+N: Create a new project based on a template
Ctrl+Alt+O: Open an existing project
Ctrl+S: Backup the project
Ctrl+Alt+E: Open the export layer window
Ctrl+O: Link data
Ctrl+W: Unlink data
Ctrl+Alt+W: Add Web data
Ctrl+G: Add a new group in the table of content. if nothing is selected, the new group will be added at the end of the table of contents, otherwise the new group will be added as a child of the selected group
Navigation tools
<: Previous zoom
Z: Zoom tool
H: Pan tool
Ctrl+0: Zoom to the full extent
Ctrl+1: Zoom to frame
Ctrl+2: Zoom to selected layer
Ctrl+R: Refresh display
Editor tools
D: Draw a feature
M: Modify a feature
P: Draw a Bezier
A: Modify a Bezier
Ctrl+Z: Remove the last vertex
Ctrl+V: Display the vertex positions window
I: Insert vertex
C: Delete vertex
Ctrl+T: Move a shared Node
DEL: Delete the selected objects
Ctrl+X: Activate the line cutter tool
Ctrl+F: Merge the selected lines
Ctrl+I: Create intersections
Ctrl+Alt+F: Flip the selected line (change the orientation)
Ctrl+G: Display the snapping panel
Ctrl+Alt+G: Display snapping radius
Ctrl+Alt+S: Smooth line
V: Selection tool
Ctrl+D: Clear Selection
ENTER / TAB: Finish a segment or apply the modifications
ESC: Cancel an edition or modification
Attribute tools
Ctrl+A: Display the Object attribute window
Ctrl+Alt+A: Display the Object attribute window (batch)
Ctrl+Y: Set Orientation tool
Others
Ctrl+L: Display the log window
Ctrl+Alt+R: Run the selected query
Ctrl+Alt+I: Display the information Window